aws-amplifyというサービスを使うと短時間で本番環境にWebアプリケーションをデプロイすることができます。
aws-amplifyのすごいところは、HTTPSの設定やログイン機能の実装など、初心者には結構とっつきにくい、時間がかかる工程を、ボタンひとつで済ませるようになったことです。
この記事で分かることは、AWS-amplifyを使ったReact.jsアプリの開発の方法についてです。
AWS-amplifyの始め方
AWSのアカウントは持っている前提とします。
まずはデスクトップ上で'reactsample'のような任意の名前のフォルダを作ります。
mkdir reactsample
cd reactsample
次にnpxコマンドでreactアプリを作成します。(今回はtimerという名前のアプリを作ることとします。)
timerという名前のアプリを作ると、timerという名前のフォルダが出現しますので、移動します。
npx create-react-app timer
cd timer
これからは、このフォルダの中のsrcフォルダで主に作業をしていきます。
cd srcこのsrcフォルダには、App.jsというファイルがすでにありますが、これから書き換えていきます。
import React from 'react';
import logo from './logo.svg';
import './App.css';
import Timer from './Timer';
import Main from './Main';

function App() {
  return (
    <div>
    <Main />
    </div>
  );
}

export default App;
上記のように書き換えてください。
Reactでは、コンポーネントという概念が非常に重要になってきます。
4行目、5行目については、それぞれ同じ階層にこれから作成する'Timer.js','Main.js'というファイルを読みこむ、という意味を表しています。
function App(){
return()
}
というのが一番大事な関数です。この関数の結果をindex.jsが読み取り、画面に描画します。
export default App;により、他のファイルでこのApp.jsを読み込むことができます。
試しに同じ階層にあるindex.jsを見てみましょう。
import React from 'react';
import ReactDOM from 'react-dom';
import './index.css';
import App from './App';
import * as serviceWorker from './serviceWorker';

ReactDOM.render(
  <React.StrictMode>
    <App />
  </React.StrictMode>,
  document.getElementById('root')
);

// If you want your app to work offline and load faster, you can change
// unregister() to register() below. Note this comes with some pitfalls.
// Learn more about service workers: https://bit.ly/CRA-PWA
serviceWorker.unregister();
4行目に import App from './App'; という表記がありますね。
ここで先のApp.jsの関数を読み込んでいるのです。App.jsの末尾で export default App;と書かなければ、index.jsでこのように読み込むことはできません。
また9行目に<App />という表記がありますね。これはApp.jsをコンポーネントとしてはめ込んでいます。
では、簡単な時計アプリを作っていきます。
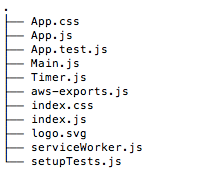
最終的なsrc内のフォルダ構成は以下のようになります。
今からMain.js,Timer.jsを作っていきます。
//Timer.js
import React from 'react';
import ReactDOM from 'react-dom';
import './index.css';

class Timer extends React.Component{
    constructor(props){
        super(props);
        this.state={remaining:this.props.seconds};
    }

    countDown(){
        if(this.state.remaining > 0){
                this.setState((prevState)=>({
                        remaining : prevState.remaining - 1
                }));
        }
    }

    componentDidMount(){
        this.interval=setInterval(()=>this.countDown(),1000);
    }

    componentWillUnmount(){
        clearInterval(this.interval);
    }

    render(){
        return(
          <div>
                <h1>Hello,{this.props.name}!</h1>
                <h2>{this.state.remaining} seconds remaining.</h2>
          </div>
        );
    }
}

export default Timer;
//Main.js
import React from 'react';
import { Typography, TextField, Button, CssBaseline, Container, DialogTitle, Dialog } from '@material-ui/core';
import Timer from './Timer';

const Main =() => {
                return(
                        <Container maxWidth='sm'>
                                <CssBaseline />
                                <Typography variant='h5'>ようこそ時計アプリへ</Typography>
                                <form>
                                <TextField
                                label='名前'
                                name='name'
                                variant='outlined'
                                size='small'
                                fullWidth
                                margin='normal' />
                                <Button
                                variant='contained'
                                color='primary'
                                fullWidth>
                                Click!
                                </Button>
                                </form>
                        <Timer name='Filange' seconds={180} />
                        </Container>

                );
}

export default Main;